
Just a few pleasant images for this Friday. Have a great weekend!


Carousel Jewelry Holder: A How-To Post
I meant to put this up a couple of months ago but did not for some reason. I put up my Ferris Wheel Jewelry Holder How-To. Well this goes along with that post and it is also an easy alteration. I made this to go on my dresser to display part of my somewhat big handmade jewelry collection.
You'll start with buying the cupcake holder on Amazon. Once you get it-put it together per the instructions.
Other things you need:
-glue
-felt
-marker
-empty cereal box
-something to measure your circles( I used a roll of tape)
-scissors

Step 1: Put the cupcake holder together
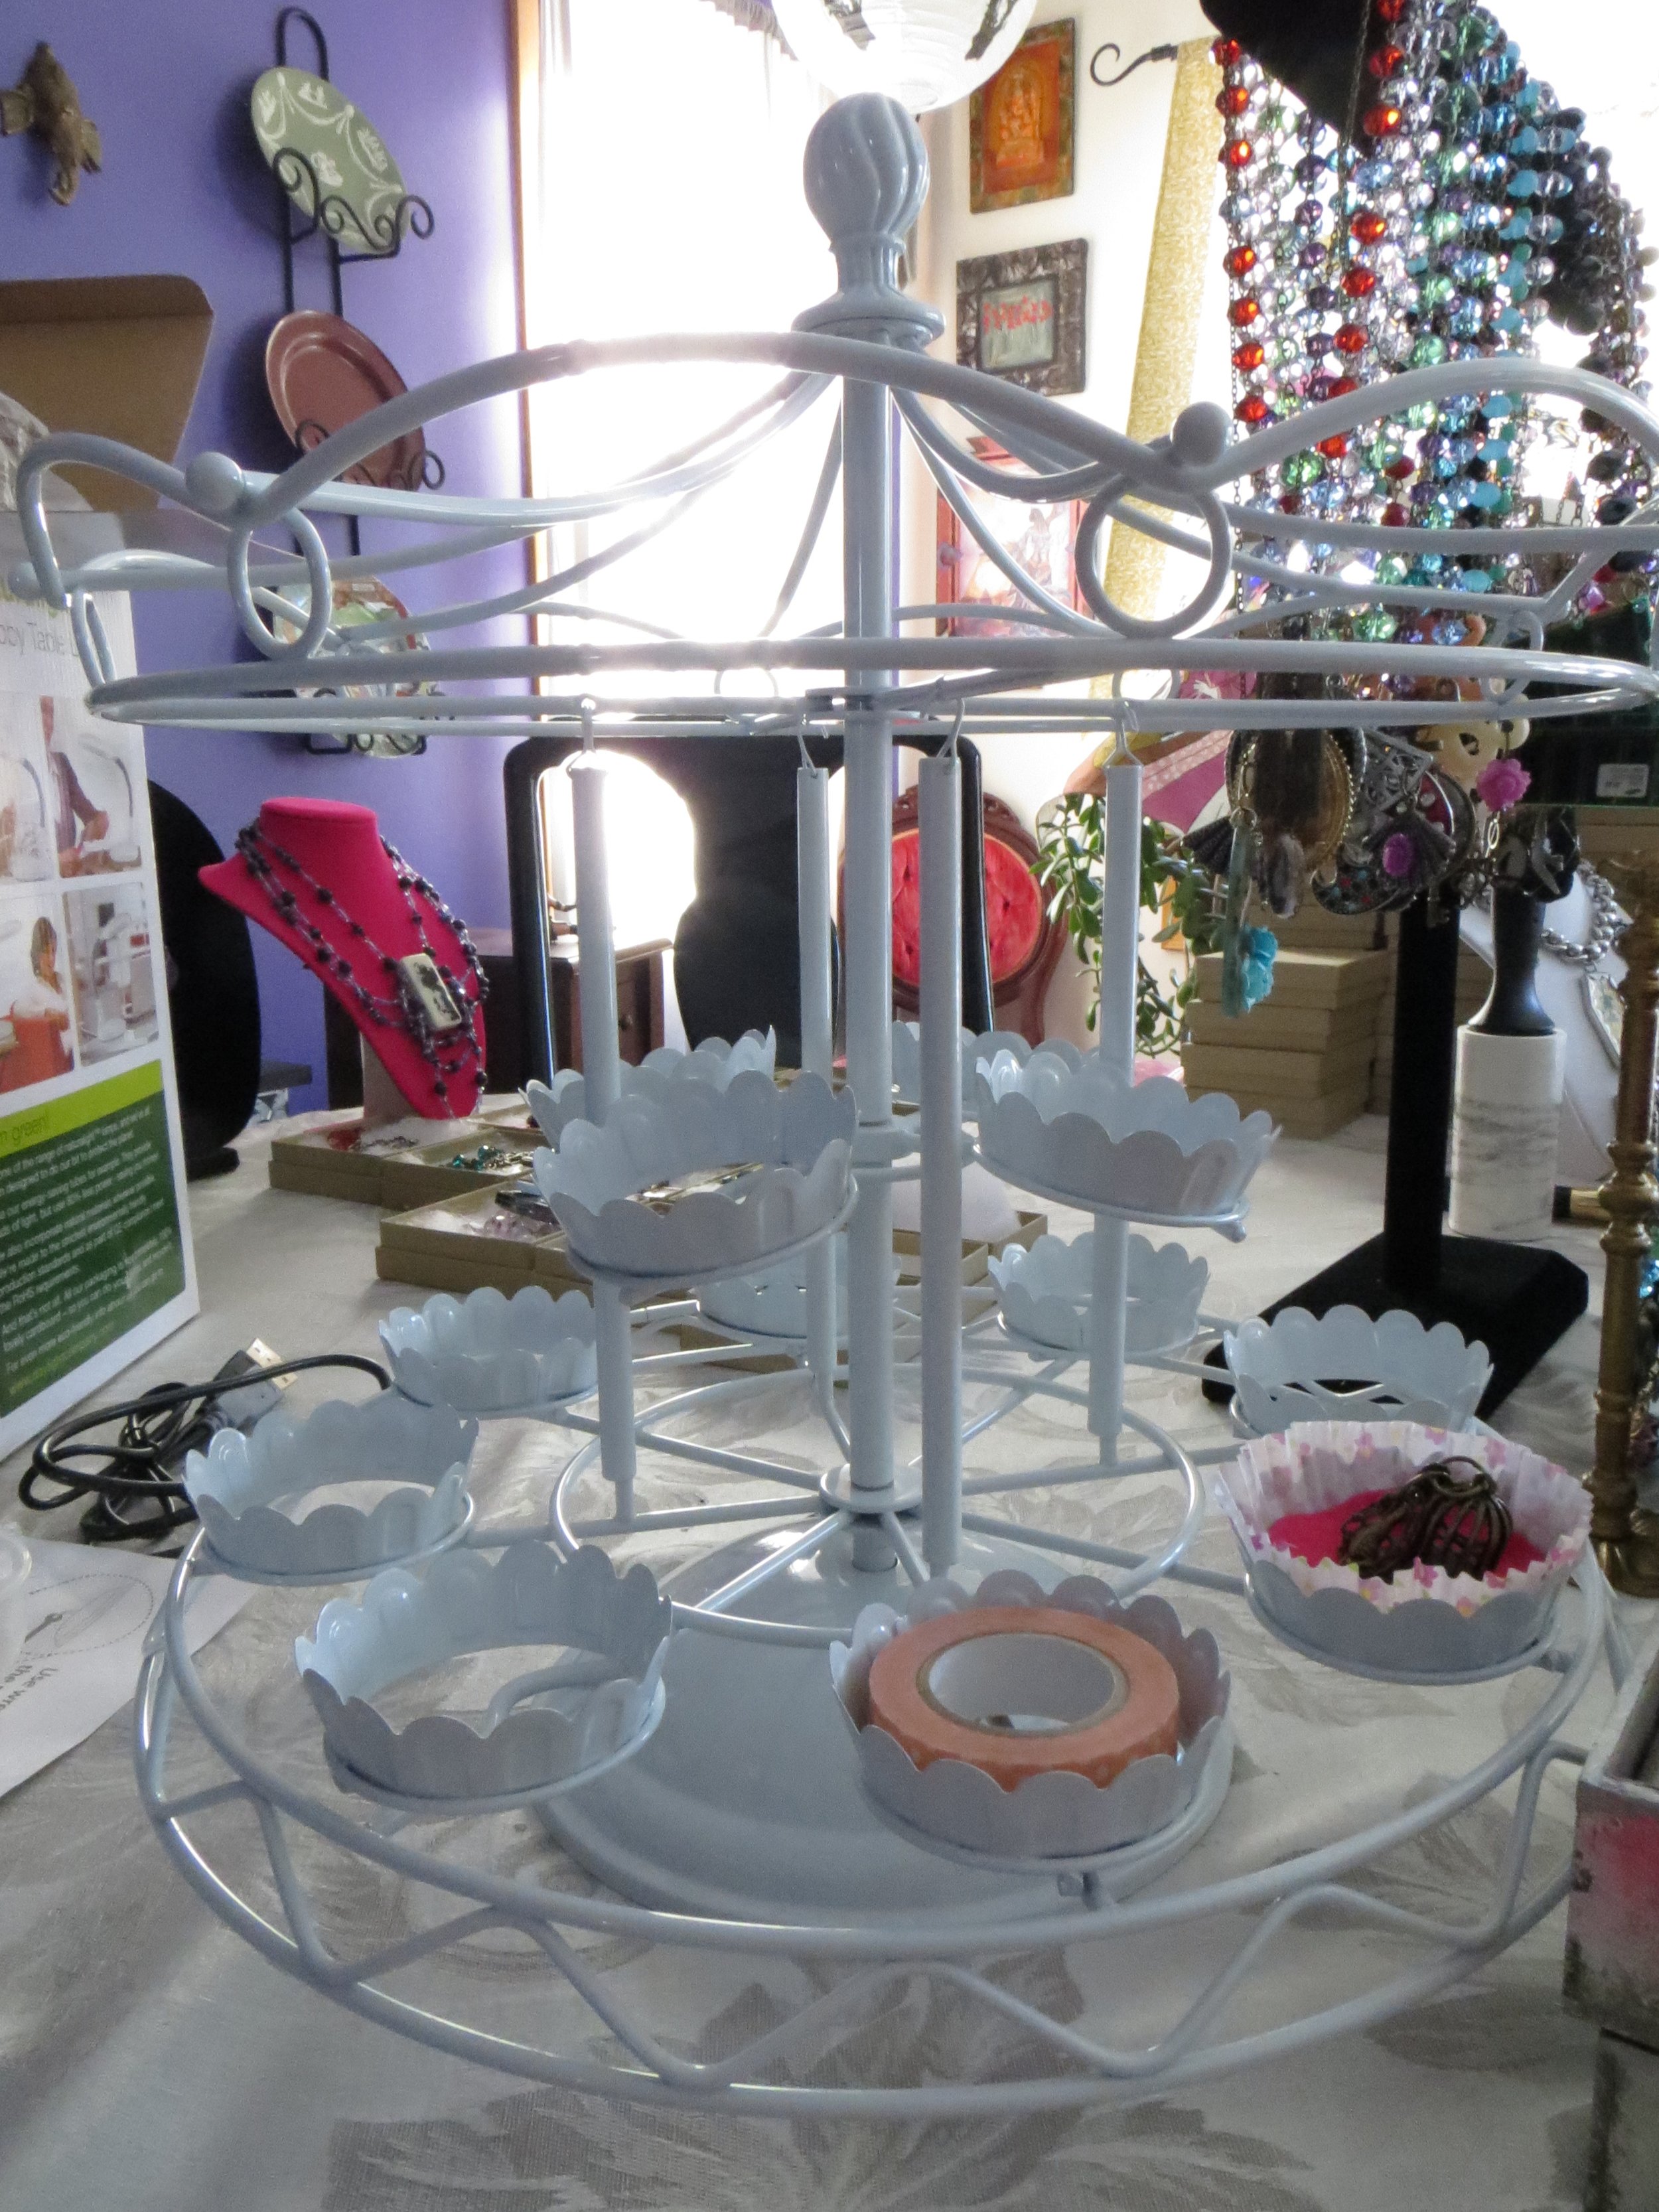
As you can see from the picture, after I put it together I was measuring the holder trays to figure out what I could use to measure what material I was deciding to use. I started with cupcake liners. Too flimsy. I tried paper and plain material. Fell through the bottom. Then I thought of felt. I realized I needed something to make it more sturdy but not too thick. And that's where the cereal box comes in:

Step 2: Draw circles with whatever size you decide to make your pieces.

Step 3: Draw the circles on the felt too.

Step 4: Cut them out. Cardboard and felt. This is pretty hard for me. I am terrible at cutting circles. But I trimmed them down and got pretty close.

Step 5: Glue them together.

Step 6: Love yourself. (I wrote myself notes on the bottom when they were dry)

Step 7: Put your circles into the trays.


Step 8: Fill with Pretties


A few months later and I still love my little set-up!
Blue Tuesday
Blue is the theme of my life these days. More on that soon....


Flowers for you.....


Spring Cleaning, Projects, Decorate....OH MY!
Between editing my book and working on house projects I don't have a ton of time. I also have been making jewelry like a mad woman. I have been quite happily adding details to my lovely remodeled bedroom. I'll be taking a break for about 5 days from everything but then it'll be back to it on Monday. I hope your spring cleaning and projects are going well!
Blood Moon
I have no doubt the internet runneth over with posts about the eclipse from last night. It is pretty amazing. Here are some pics from my backyard and snaps from my SkyView App. which I think is an amazing application. You can read about the Blood Moon Eclipse here on the NASA website. Plus, if I read correctly MARS was as close as it gets too. Pretty fantastic!


Forgotten Passions
I've spent the last few weeks cleaning out my office from top to bottom. Folders, nooks, crannies, over stacked piles. As I've been doing this I've been finding fun things I forgot about. One of these things is my sketch notebooks full of clothings designs. I haven't done this in a long time and having come across my drawings (from 1997-1998) I am thinking to start designing again. Just for fun. I don't have any plans to do anything with them but I certainly have a lot of ideas nonetheless. Here are some of my first sketches from so long ago.


What to Eat Wednesday, One Pot Pasta
I don't make a lot of pasta. I tend to cook a lot of curry and Thai food because they are my favorites. I decided I wanted to find a few easy to make pasta dishes and came across this One Pot Pasta recipe on the A Beautiful Mess blog. I like to read this blog but truth be told most of the projects on here are not my taste nor is the decorating my style and most of the food is not vegan. That said I still like to read it. I do pull a few things from it plus I find it inspiring that these two women made their own careers out of being creative. You should take a look at it.
Now back to the pasta. There was a storm for about the billionth time and I made the pasta for dinner that night when we were stuck inside and waiting for the snow.
It was really easy to make vegan by buying vegan pasta and leaving out the cheese. It's funny because you'll feel very skeptical that this is going to taste anything but mushy. It however, turned out great. And the leftovers I threw in a baking dish with crumbled bread crumbs on top and warmed it in the oven for lunch. Also, delicious. I'm going to try another one of their recipes soon and also make it vegan. Until then, Ciao!


Your Weekly Meow
This is a bit of a smaller post of cats. It's been a long week with cat care and it's not over yet. My poor little cat Charlotte had to have a mass removed from her side and we are currently waiting on the test results to see if it might need further treatment. How crazy attached we get to these little creatures. She is pretty much acting like her old self already. In fact, I'd say she's recovering better than I am. Send positive kitty vibes please!


Your Weekly Meow
And for my 200th post(!) I give you an epic cat post! Happy Valentine's Day!


My First How To Post: Ferris Wheel Jewelry holder
So this is my first post about doing a little craft. It’s not very complicated and I thought it would make a cute project. This all came about as I’ve been remodeling my bedroom over the last 3 months. I wanted a new way to store and display jewelry. I have a lot of jewelry. I have been collecting handmade pieces for a very long time now. Additionally I make a lot of things for myself and I am lucky enough to have friends to make things for me as well. I searched and searched for display pieces but nothing was really striking my fancy. There’s plenty of pretty things out there they just were not what I was looking for. I came across some circus themed boxes on ETSY and loved the idea of a carnival. I adore the book The Night Circus and well, pretty much anything to do with magic, magicians and carnivals. Which got me started looking for carnival themed display pieces for my jewelry and there are pretty well none. What I did keep coming across was carnival themed party items and more importantly cupcake holders. They are tremendously cute for cupcakes but I don’t have cupcakes on display every day in my house although that would be quite spectacular. I started to consider if I could somehow make these work for my display pieces. I decided to order a couple from AMAZON. A carousel and ferris wheel, respectively. When they arrived I altered them a bit and I am in love with the results. Here is the alterations I did for the Ferris Wheel cupcake holder to turn it into a jewelry holder. I will post the carousel next week.
Things you will need:
-pliers
-Ferris Wheel
-paper flowers -these can be found at most craft stores often in the wedding decor section
Optional: you can paint these no doubt, I wanted mine black and white to stick with a Dark Carnival/Night Circus theme and to go with a painting a friend made for me but you can do yours whatever colors match your room/display

This is how it comes and what it's supposed to look like.

Out of the box with all it's baskets attached. Also, see all the things I make in the background mess? This is why I need organization.

The paper roses I used to decorate the ferris wheel. The "stems" are made with very malleable wire so it is very easy to wrap these any way and anywhere you want. I got mine at Micheal's Arts & Crafts store.

I used my pliers to remove most of the baskets. I left two on for counter balance and to put bracelets in. You could remove as many or as few as you want I would think.
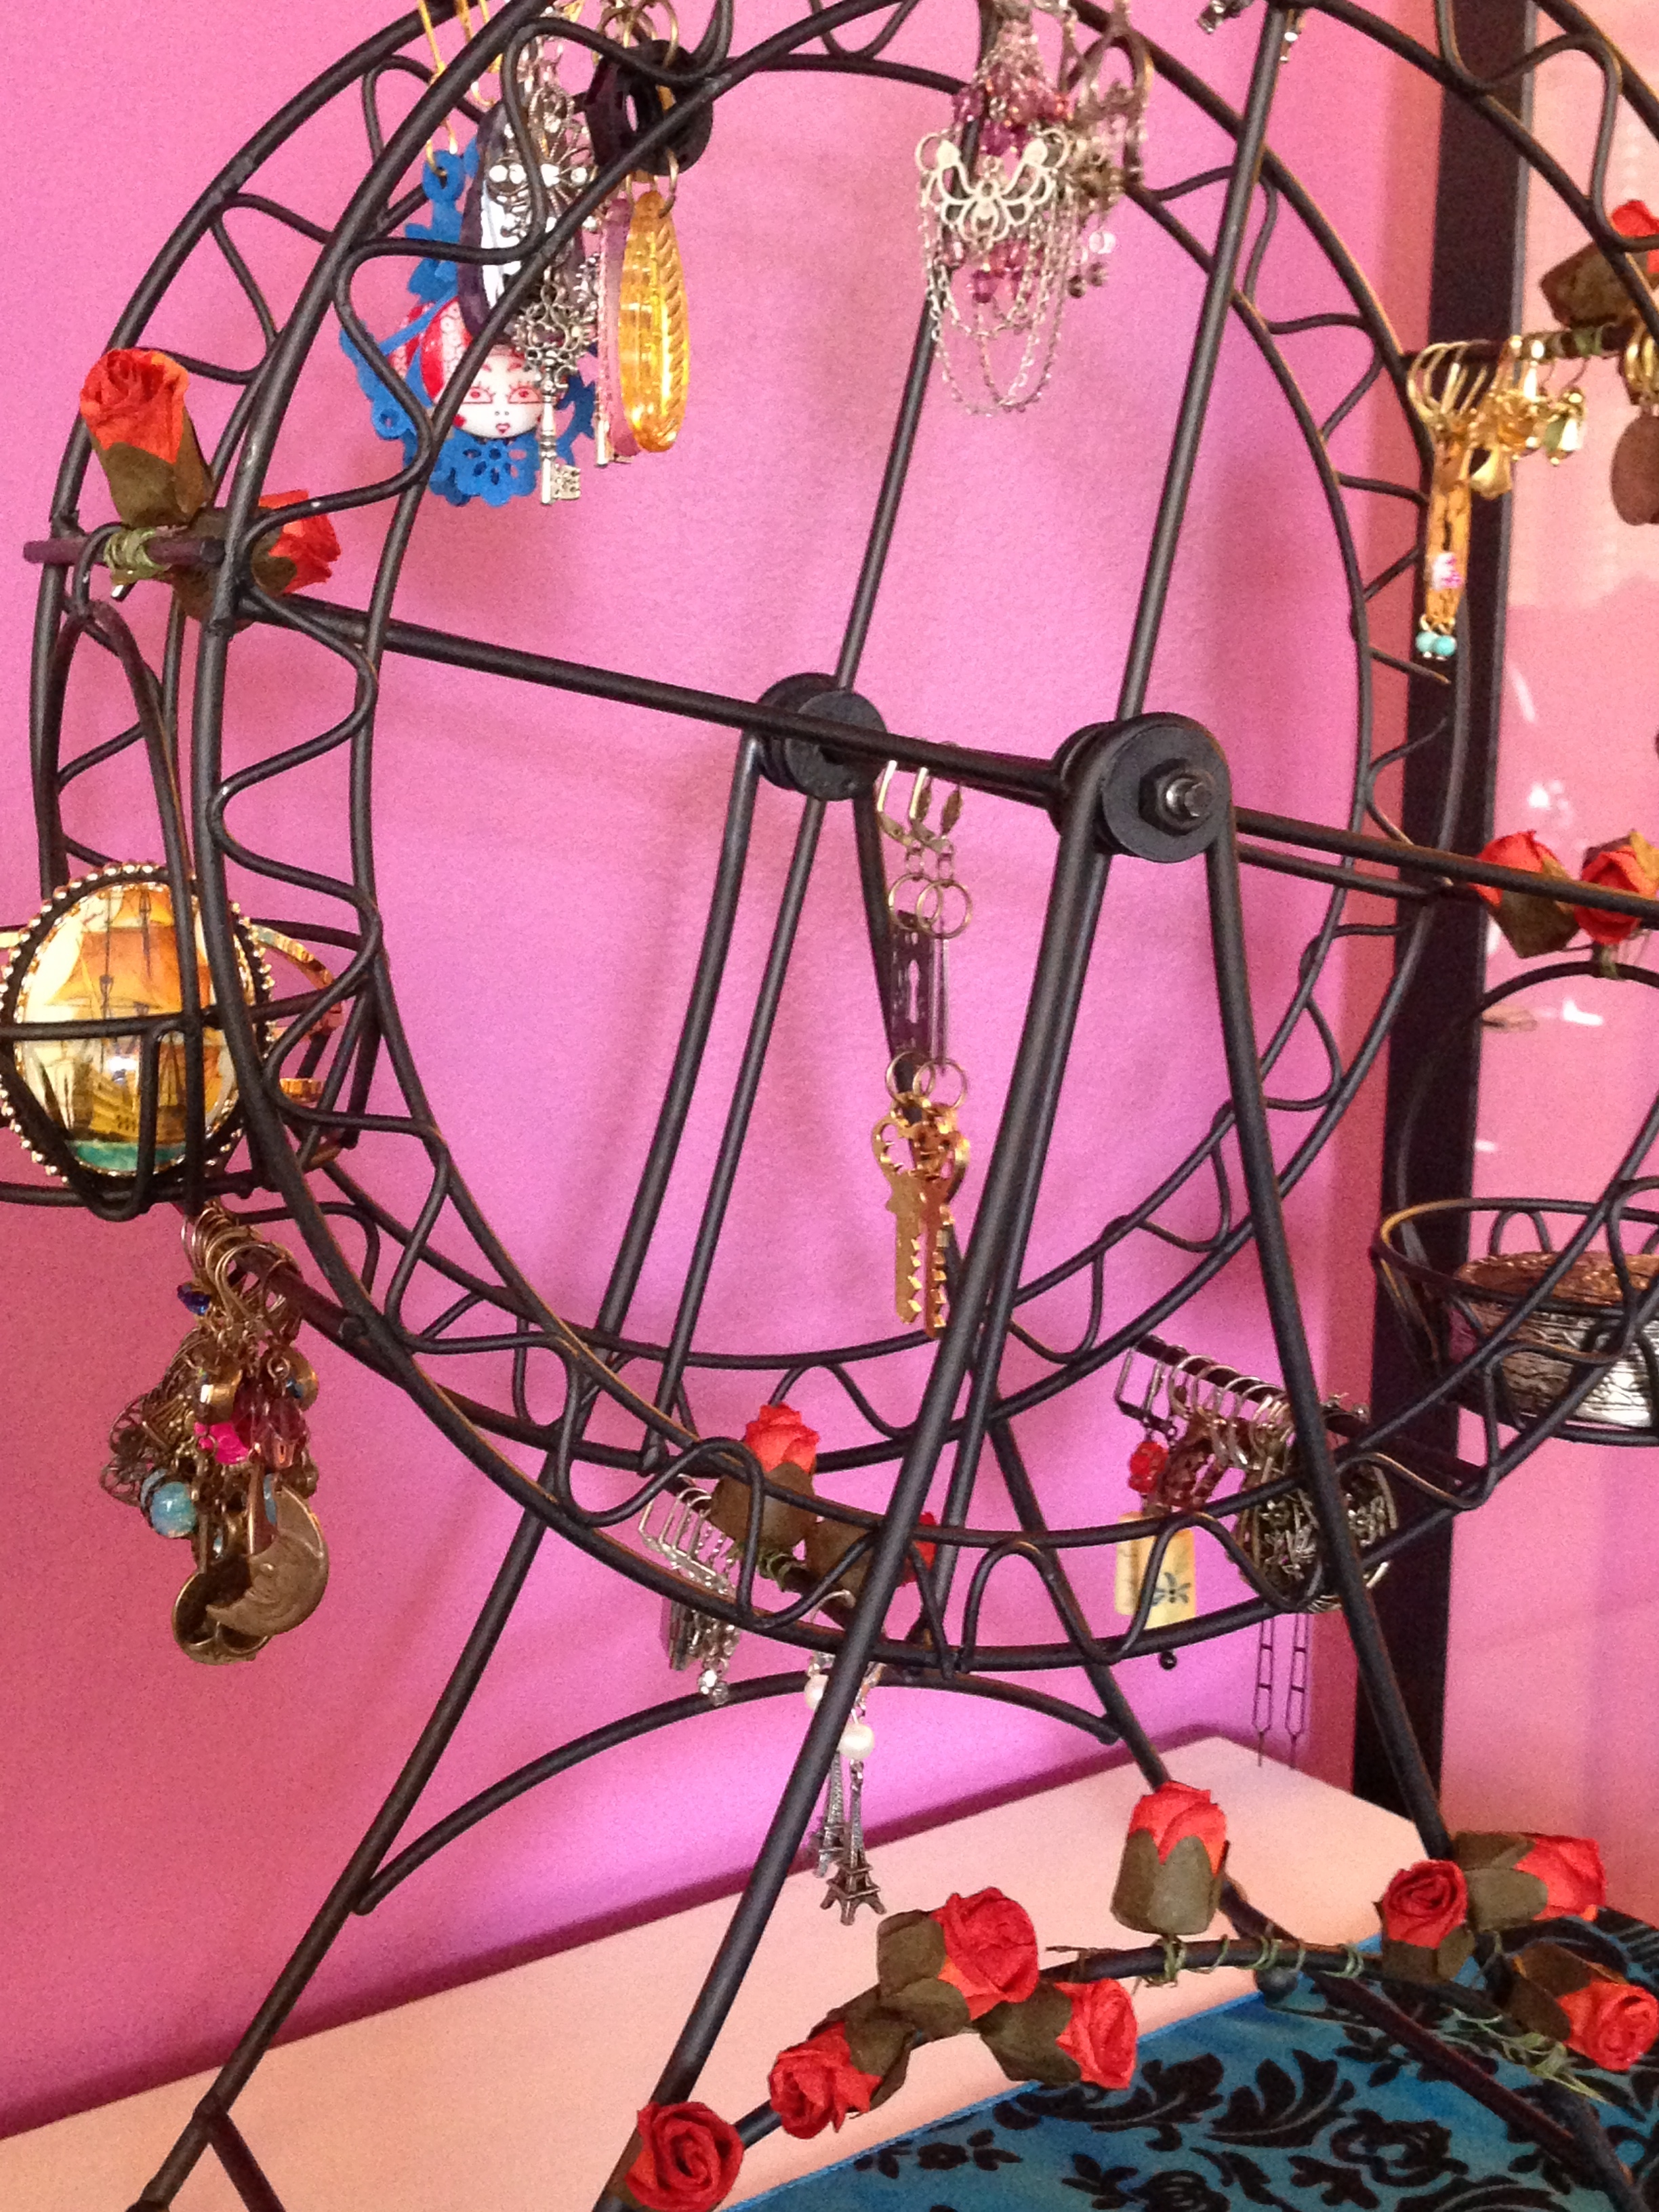
Add flowers where you like and earrings. Easy peasy.


And thus I began to build my own carnival.
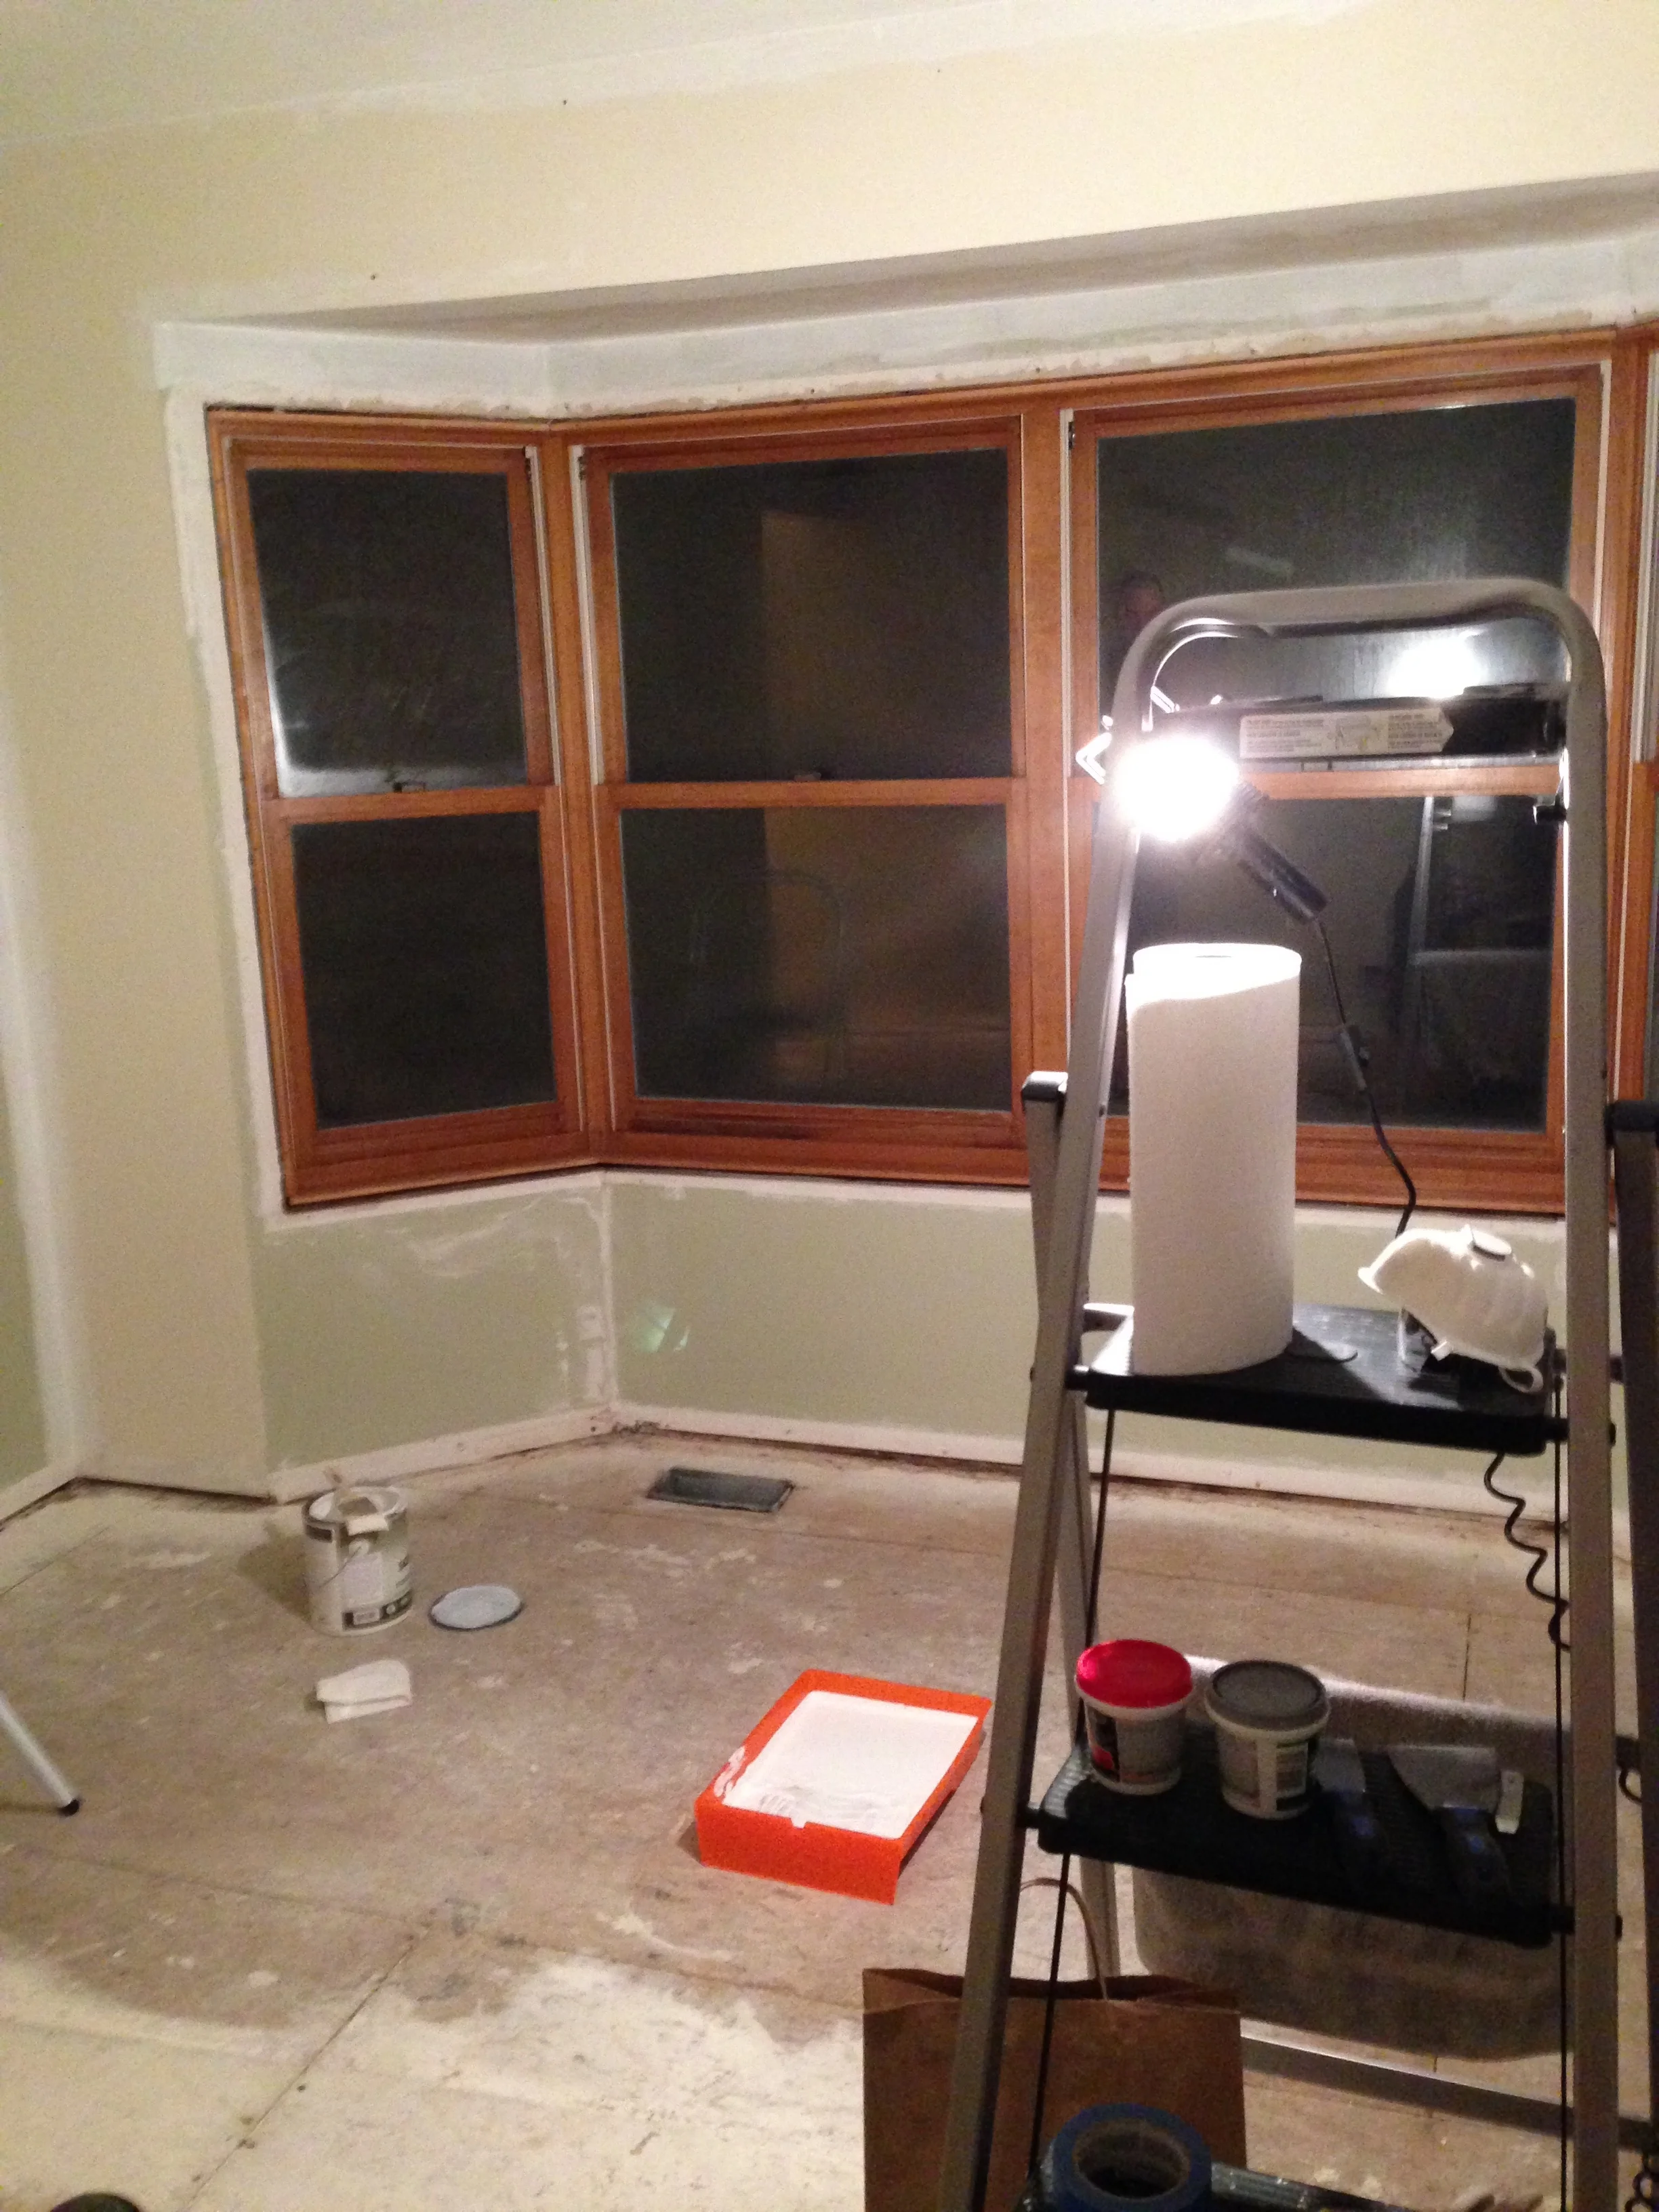
Minnesota Monday, Remodel Reality.
I love decorating blogs. I love looking on Pinterest for decorating ideas. What's more is that I really like doing a lot of things myself and so does my boyfriend. That said decorating blogs and pinterest can sometimes drive me more than a little nuts because no one ever seems to ever have any problems with anything. Everything seems to go smoothly and on schedule. Maybe it's just me and I carry some sort of remodeling curse but things almost never go right and they are NEVER on schedule. No one tells you that truth. What takes forever first in our world is that we won't go into debt to do house projects. With that rule we have not remodeled much of our house nor have we done a big project in about 5 years. We've remodeled our office, media room, master closet and laundry room. Well now we've gotten back to it and have been working on our bedroom and we are now nearly three months past schedule. There is an end in sight finally but let me tell you, if it could go wrong it has gone wrong. I'm going to share a few snapshots from my phone of the work and will hopefully be able to show you more soon. Like in a week, fingers crossed. Oh and the reason this is Minnesota Monday and not some fun winery or musem visit is because this project has been taking up most of our time....


CatDay


What to Eat Wednesday but on Thursday, Forks Over Knives
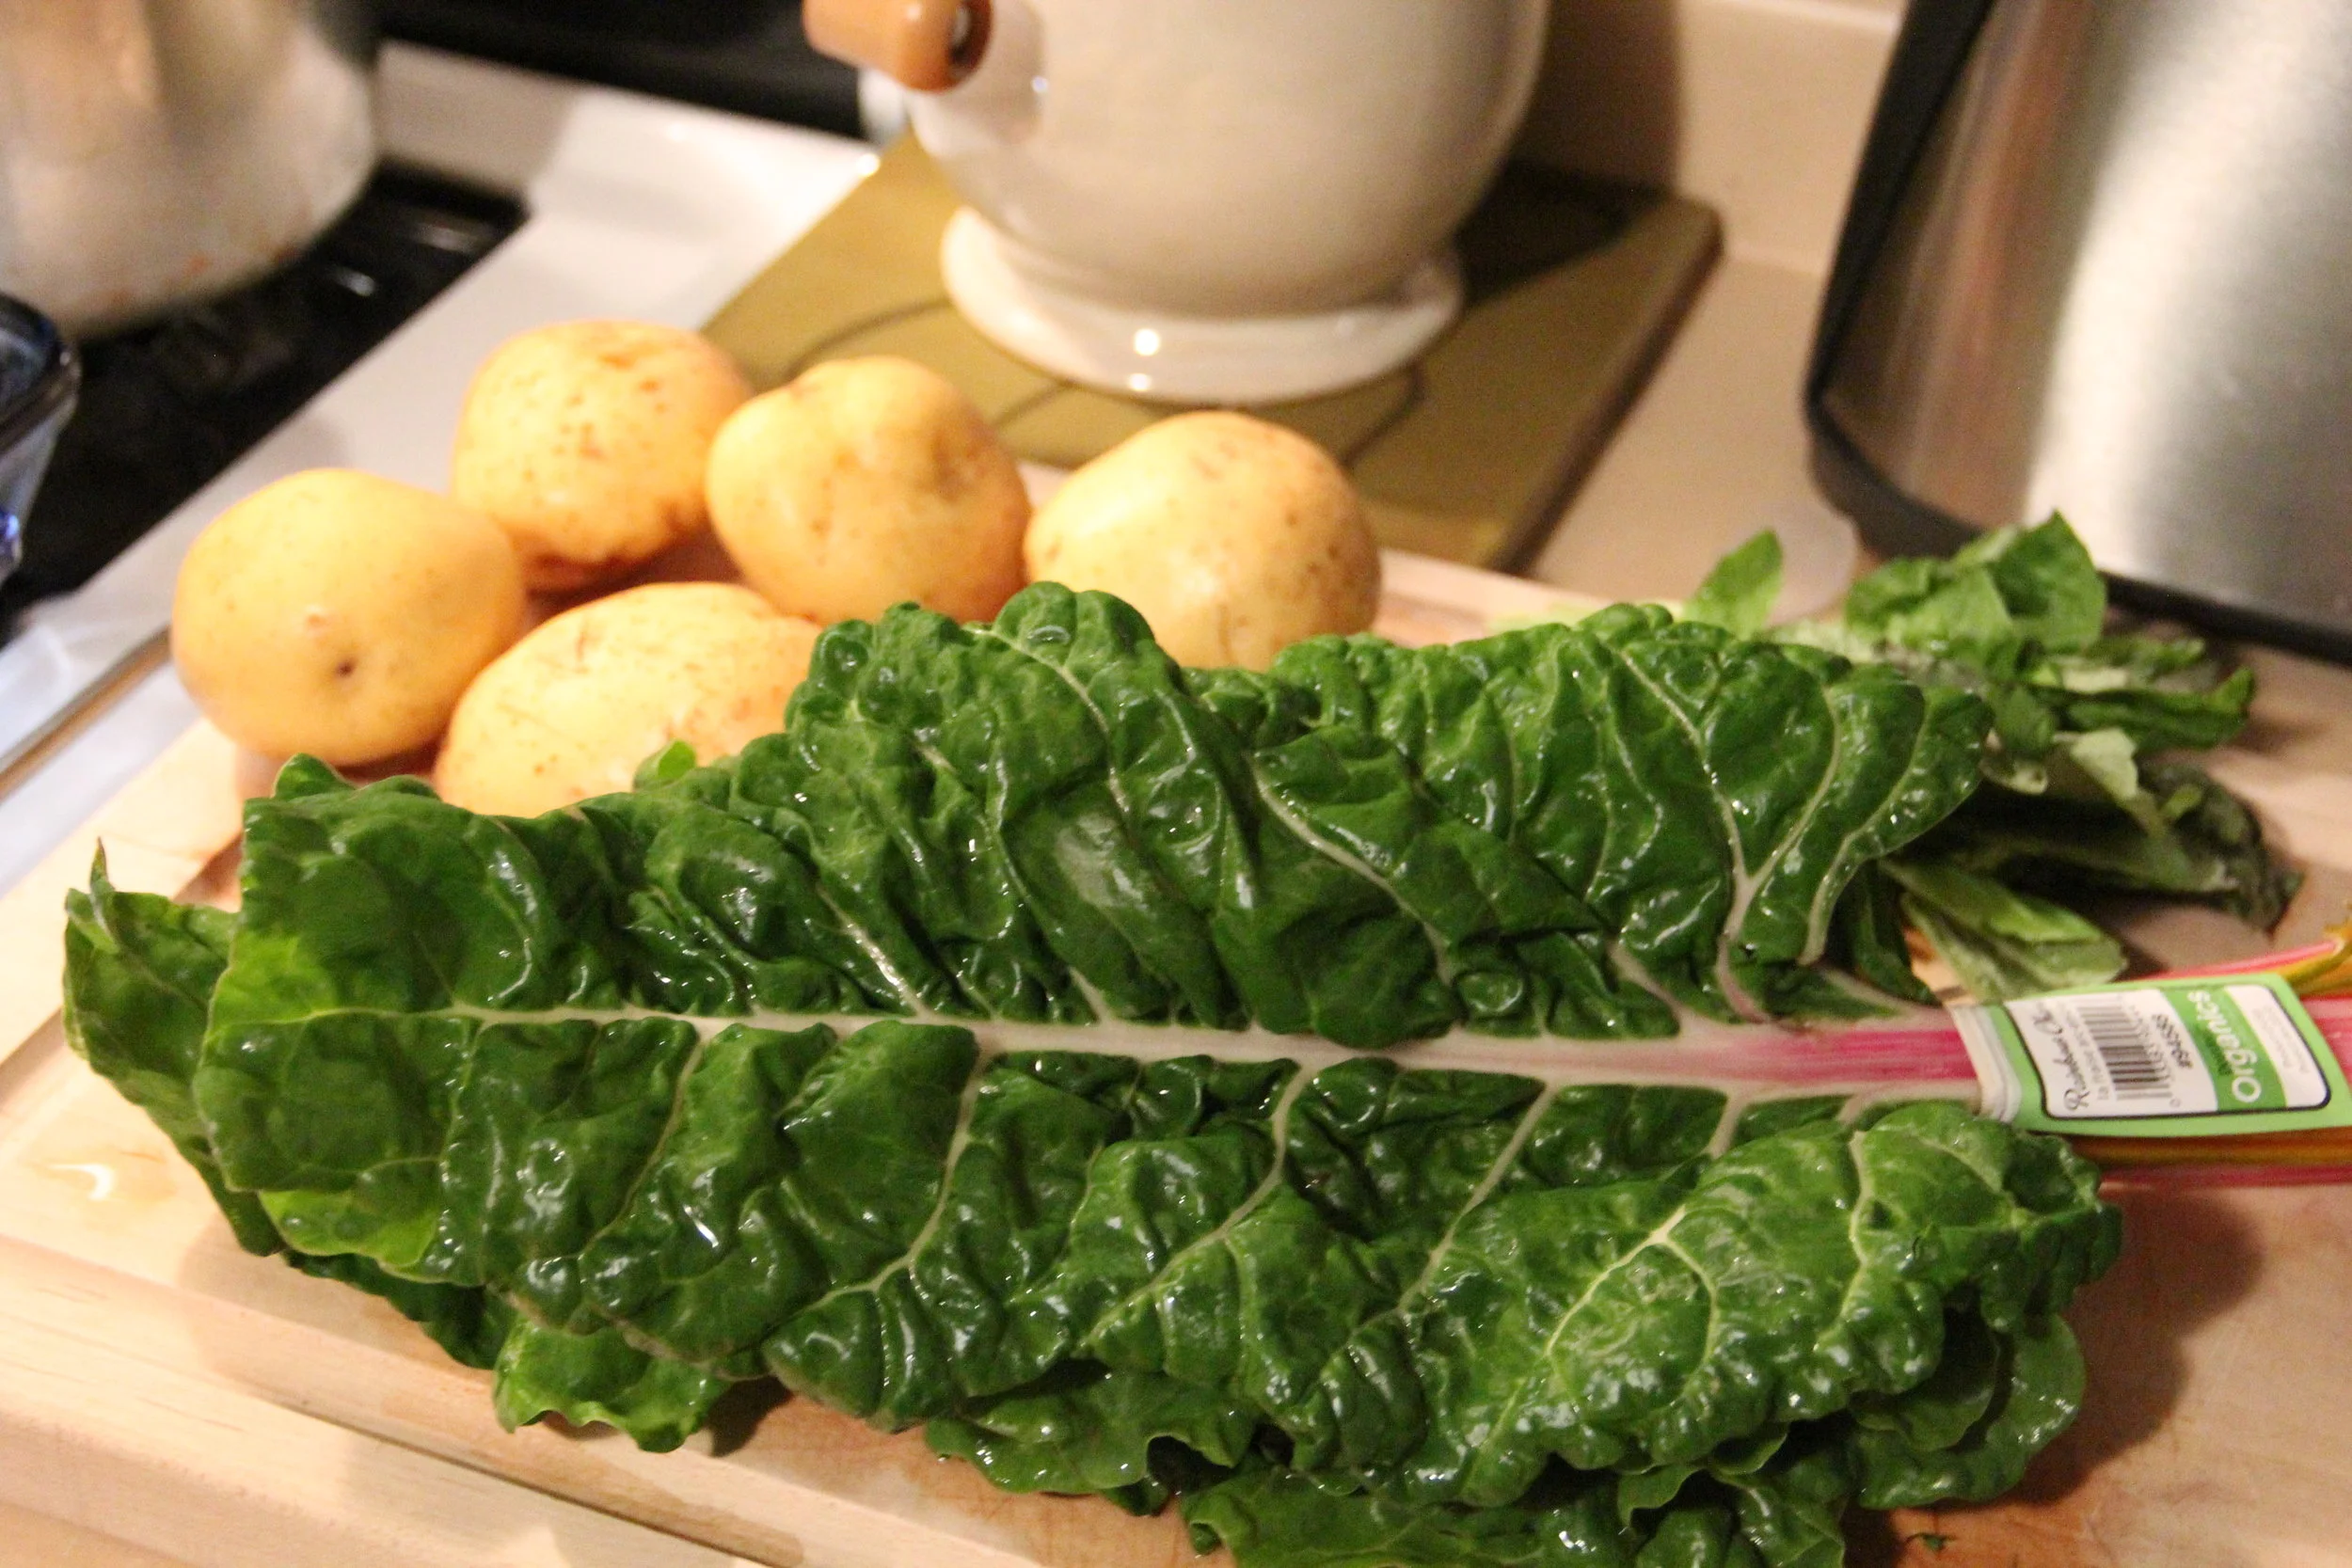
So this recipe is not one of mine but it is one that I tried and thought came out great. It is a vegan au gratin from the website Forks Over Knives. The mission of Forks Over Knives seems to be teaching people about a plant based diet as a means to fight disease. Now, this information is not new to me but everyone has to learn in their own time. I highly encourage you to try out this recipe. I thought it was very good and it's a nice winter comfort food. The only thing I really changed was not slicing the potatoes with a mandolin. I thought they were too thin so I used a knife instead. I also soaked my cashews for the cream sauce for a couple of hours as opposed to 15 minutes. I think they're easier to blend that way. I used Rainbow Chard, a green I've not cooked with before. I found that I liked it quite a bit. I plan to try out more of the recipes on this site. Here is the link again: Forks Over Knives Au-Gratin. Have a Yummy Day!


Chaos
I am in the middle of a mess. My bedroom is being remodeled. This is very exciting sans the fact it was supposed to be done almost two months ago. Because of the way my house is laid out this has disrupted quite a lot of my space. Including my office which is normally my place of calm and organization. That is not the case right now and truth be told it's making me a little nuts. I know my room is going to be amazing when it's done but it can be difficult to live with such disorganization. Especially when you're attempting to work at home. But what are you going to do but keep working on it? Anyway, my What to Eat post will be up tomorrow as I am polishing it up, so to speak. I just started Photoshop lessons so I am looking forward to what I can do with my pictures. In the meantime, here are a few of my office from a few months ago when it was at it's nicest and most organized. Have a great and chaos free day!


Minnesota Monday a.k.a. Shameless Self Promotion
This weekend I had my first open house for my jewelry shop. It was a way for me to learn some ins and outs of hopefully moving on to craft shows. It went wonderfully and my friends, family, former co-workers and new friends came out to support me in a big way. Here are a few snaps from my weekend as well as the link to my shop which I would love it if you visited.


I would be delighted if you stopped by: GirlyGeekChic !!
Time Time Time
My week is slipping away from me again. I am at least feeling better. I'm having my very first open house for the jewelry I make this weekend and I am crazy nervous! I've been cleaning my house like nuts when I don't feel too terrible.


What to Eat Wednesday, Vegan Thanksgiving Pajama Potluck
After I moved out of my parents' house, I stopped celebrating Thanksgiving. I never really liked it all that much. I didn't celebrate it for some years until I started seeing my current boyfriend and transitioned to an almost completely vegan diet. We started off having a dinner with one or two other couples over the next few years until I started to realize that not only did a lot of my friends not eat meat or diary but a lot of them also had family that were too far away to visit every year. Most of my vegetarian and vegan friends who did go see family during the day were basically stuck eating whatever side dishes might happen to be ok for them. And for some of my lactose intolerant friends this was a nightmare as we all know most everything traditional and American is laden with butter or milk. So we came up with a new tradition a few years ago and one that has been working tremendously well. I hope we stick with it for many years. Especially since I have worked to make what I think is the best tofurky. Now, you can just follow the directions on the box. Which I have done. I have tried both the ways they list on the website but what I like better and have been complimented on time and time again is my own amended version of the instructions.
The other point of this evening dinner is to be as comfortable as possible. I encourage everyone to wear pajamas and to bring a vegan dish to share. We always have more food then we know what to do with. So today I'll leave you with my tofurky recipe and tomorrow I'll give you my mashed potato recipe and the link to the gravy we make to go with them and it is amazing.
Using the cooking time on the box of the tofurky is fine. I usually have mine completely thawed. My changes are all in the seasonings.
1. I mix up the 3 tablespoons of olive oil and one tablespoon of wheat free soy sauce mixture. I usually make three tofurkys so I do one mixture per roast.
2. Instead of ground sage, I mix in a seasoning mix from a favorite spice shop Penzey's. It's called Bavarian Seasoning. I don't generally measure this out. Since it's salt-free you don't have to worry about it drying anything out.
3. Now, for each tofurky I buy enough FRESH sage to make a bed of it for each roast to cook on. I'll line a glass baking dish with foil and make three beds of fresh sage. This gives the roast an amazing aroma and makes your house smell nice.
4. Use a brush to coat each tofurky with the oil and soy sauce mixture. This is really important: Brush the WHOLE thing with oil otherwise it'll dry out. Do the bottom and sides well. Don't use all the mixture as you'll want more to brush it again when you remove the foil from the top and bake it for the last 10-15 minutes.
5. After each one is brushed with oil and set on the sage, sprinkle seasoning on top of each one and then cover the whole thing with foil. I usually make a pouch with the foil. It keeps the moisture in really well. I do NOT add any of the suggested vegetables. This never worked out very well in the past and with all the other food that arrives there was no point in wasting it.
Following the directions on the box for time and temperature, I put them in to cook. After the alloted time has past I'll take the dish out and remove the cover. I'll usually slice the tops open a little so I can brush the remaining oil into the tofurky for the last ten minutes or so of cooking. This also will keep it from drying out if you have to leave it in the oven on WARM while people arrive or get settled.
It should be easy to slice and serve. We usually serve it with gravy which I'll give you the recipe for tomorrow.


Random Happy Pictures
Some random shots from my phone of happy things the last week or so!


Spring Cleaning.
I am late starting my annual spring cleaning. I was pretty sick for the last two weeks. Included in my spring cleaning is working on planned blog posts. I am making a plan for regular features as well as getting it redone. I am very excited about this! Have a GREAT DAY!